

With dental implant being so popular these days, it is inevitable that as dentists, we are going to see more and more long term problems with dental implants, and some of these will be more cosmetic than an actual health problem.
Here is a recent case where my patient had a problem – and how I (kind of) solved it… at least made it a bit better!

So the history here is that the implant was placed +10 (probably +15) years ago. Its never caused a problem, and the only reason he chose to do something was the constant nagging he was getting from the hygienist and ultimately the periodontist!
Although this looks like a big problem to us dentists, his lip is low and he never shows the metal part.
I am sure it would be a bigger issue if it was visible during talking and laughing.
Even the cracked veneer was not an issue for him – but we decided to do something a little more comprehensively here.
Also, I should mention that the UR2 has a tiny root, it is now slightly mobile and there is bone loss down the mesial root (probably related to the recession we can see on the implant). And if I am honest, this was his biggest motivation to have anything done.
Problem List
From my ortho treatment planning days, I like to make a problem list, and tackle each one in turn, this is how mine looked like:
- Recession around implant UR1
- Poor prognosis UR2 – need tooth replacement
- Cracked UL1
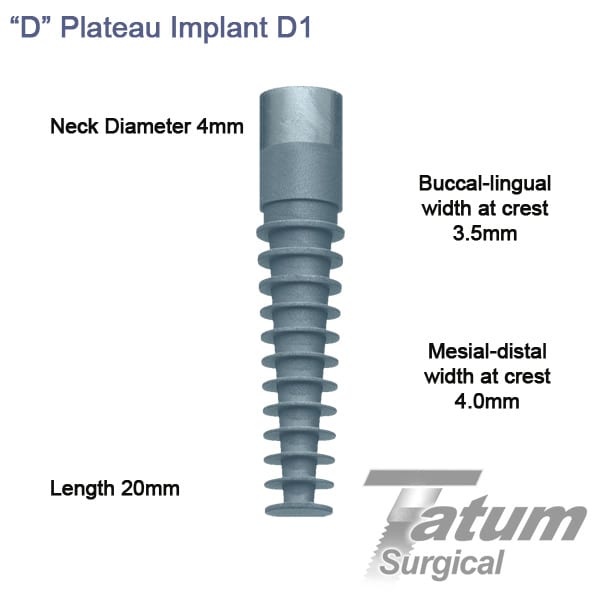
We had a long chat (my chats are normally 60-90 minutes!) and we went over a whole bunch of treatment options, including removing the implant (This was a Tatum d-fin implant – very difficult to remove – see the image below).
In the end, the plan was:
- Remove the UR2, and make a mesial cantilever provisional on the day… Let it heal
- Connective tissue graft to help the recession on the implant
- Possibly re-do the CTG if needed
- Replace the UL1 and make a final bridge on the UR2/3
Stage 1: Removing the UR2
Sorry, I don’t have photos at this stage, but essentially this is what I did:
Connect the UR2/3 with flowable composite
Take an impressions (alginate)
Remove the UR2, and remove the crown on the UR3
Use the alginate as a matrix to make the new temporary bridge (make sure to remove the excess that has gone down the socket!). For this I use LuxaCrown or LuxaTemp from DMG – this is important as its a composite based material and I can shape it in the mouth to the idea specifications that my patient and I think looks right – then the lab just copies this for the final restorations.
Stick the temporary bridge on with some more flowable composite.
Always check the occlusion and the guidance, especially on lateral incisors, as these are the most common to chip, and its always a guidance issue.
Okay, thats it for this stage, next its the tissue graft (and let’s face it, the most exciting bit of all of this!)
Stage 2: The Tissue Graft
So going into this, I explained that I don’t know what I will find when we open up the site, I may change my mind on what is possible, the graft may fail, we may want to have another go later, depending on how it heals. My patient was fine with all of this, so we got the scalpels ready.
One important inspirational dentist (Istvan Urban) often says that if your going to f-up your surgery, you’re going to do this in the first 5 minutes. i.e. the incision. So its really important to think about this in detail.
You need to think about how the site is going to be closed, how is the blood supply going to maximal, and what kind of tissue do we want to form.
I think one reason there is so much recession here is that there is very little to no keratinized tissue around the implant in the area of the recession.
There is no sign of infection here, there is no pus, no visible inflammation – I doubt there is much labial bone either – this is key in our decision to try and keep the implant, rather than remove it (in which case to have another we would need to commit to vertical and horizontal bone augmentation, soft tissue surgery and finally new implant and crown).
So lets talk about this incision, then I will share where I took the graft from and why.

So I just really follow the recession and go sulcular around the right canine.
Wherever I can, I like to avoid vertical release incisions, not only do they leave more scar tissue, but they can reduce blood supply. In this case, we have a natural vertical release incision, right where the recession is, but the goal is to close this passively.
One option is to do a laterally positioned flap, which I think would have worked here as well (possibly better – who knows!)
I chose to see how mobile I could get the flap without a lateral reposition, and see if I can get away without the extra vertical incision… If I was going to do a vertical release, I would like to have it somewhere behind the canine, so no one can see it, and to ensure the area that needs the blood supply can get as much as possible.

The second point to note is that this flap was all split thickness, that means the periosteum stays on the bone – meaning more blood supply to the graft – which I am sure the graft appreciates!
To make a flap like this more mobile, you need to extend it further laterally and make sure you are firmly into the reflected mucosa. If needed you can tunnel further left and right to loosen it all up as much as possible.
If there is not full soft tissue closure over the graft, I am not going to stress too much. The reason is that this graft is coming from the palate.
There are two areas that I like to take a graft from either the palate or the tuberosity. You get a better quality of meat from the tuberosity, and there are fewer blood vessels in that tissue. That makes the tuberosity excellent for maintaining volume.
I took this from the palate because I wasn’t sure if I would close this fully, and with a graft from the palate, I know I can leave it poking out a little.
You see, the success of anything like this is blood supply, and the way tissue grafts heal is that blood vessels from the recipient site plug into the donor plumbing and vitalize the tissue. So my thinking is that if there are more blood vessels and they are bigger from palate tissue – go for that!
Let’s look at the risks here, if this graft fails, the recession on the implant will probably get worse – and I definitely didn’t want to do that!
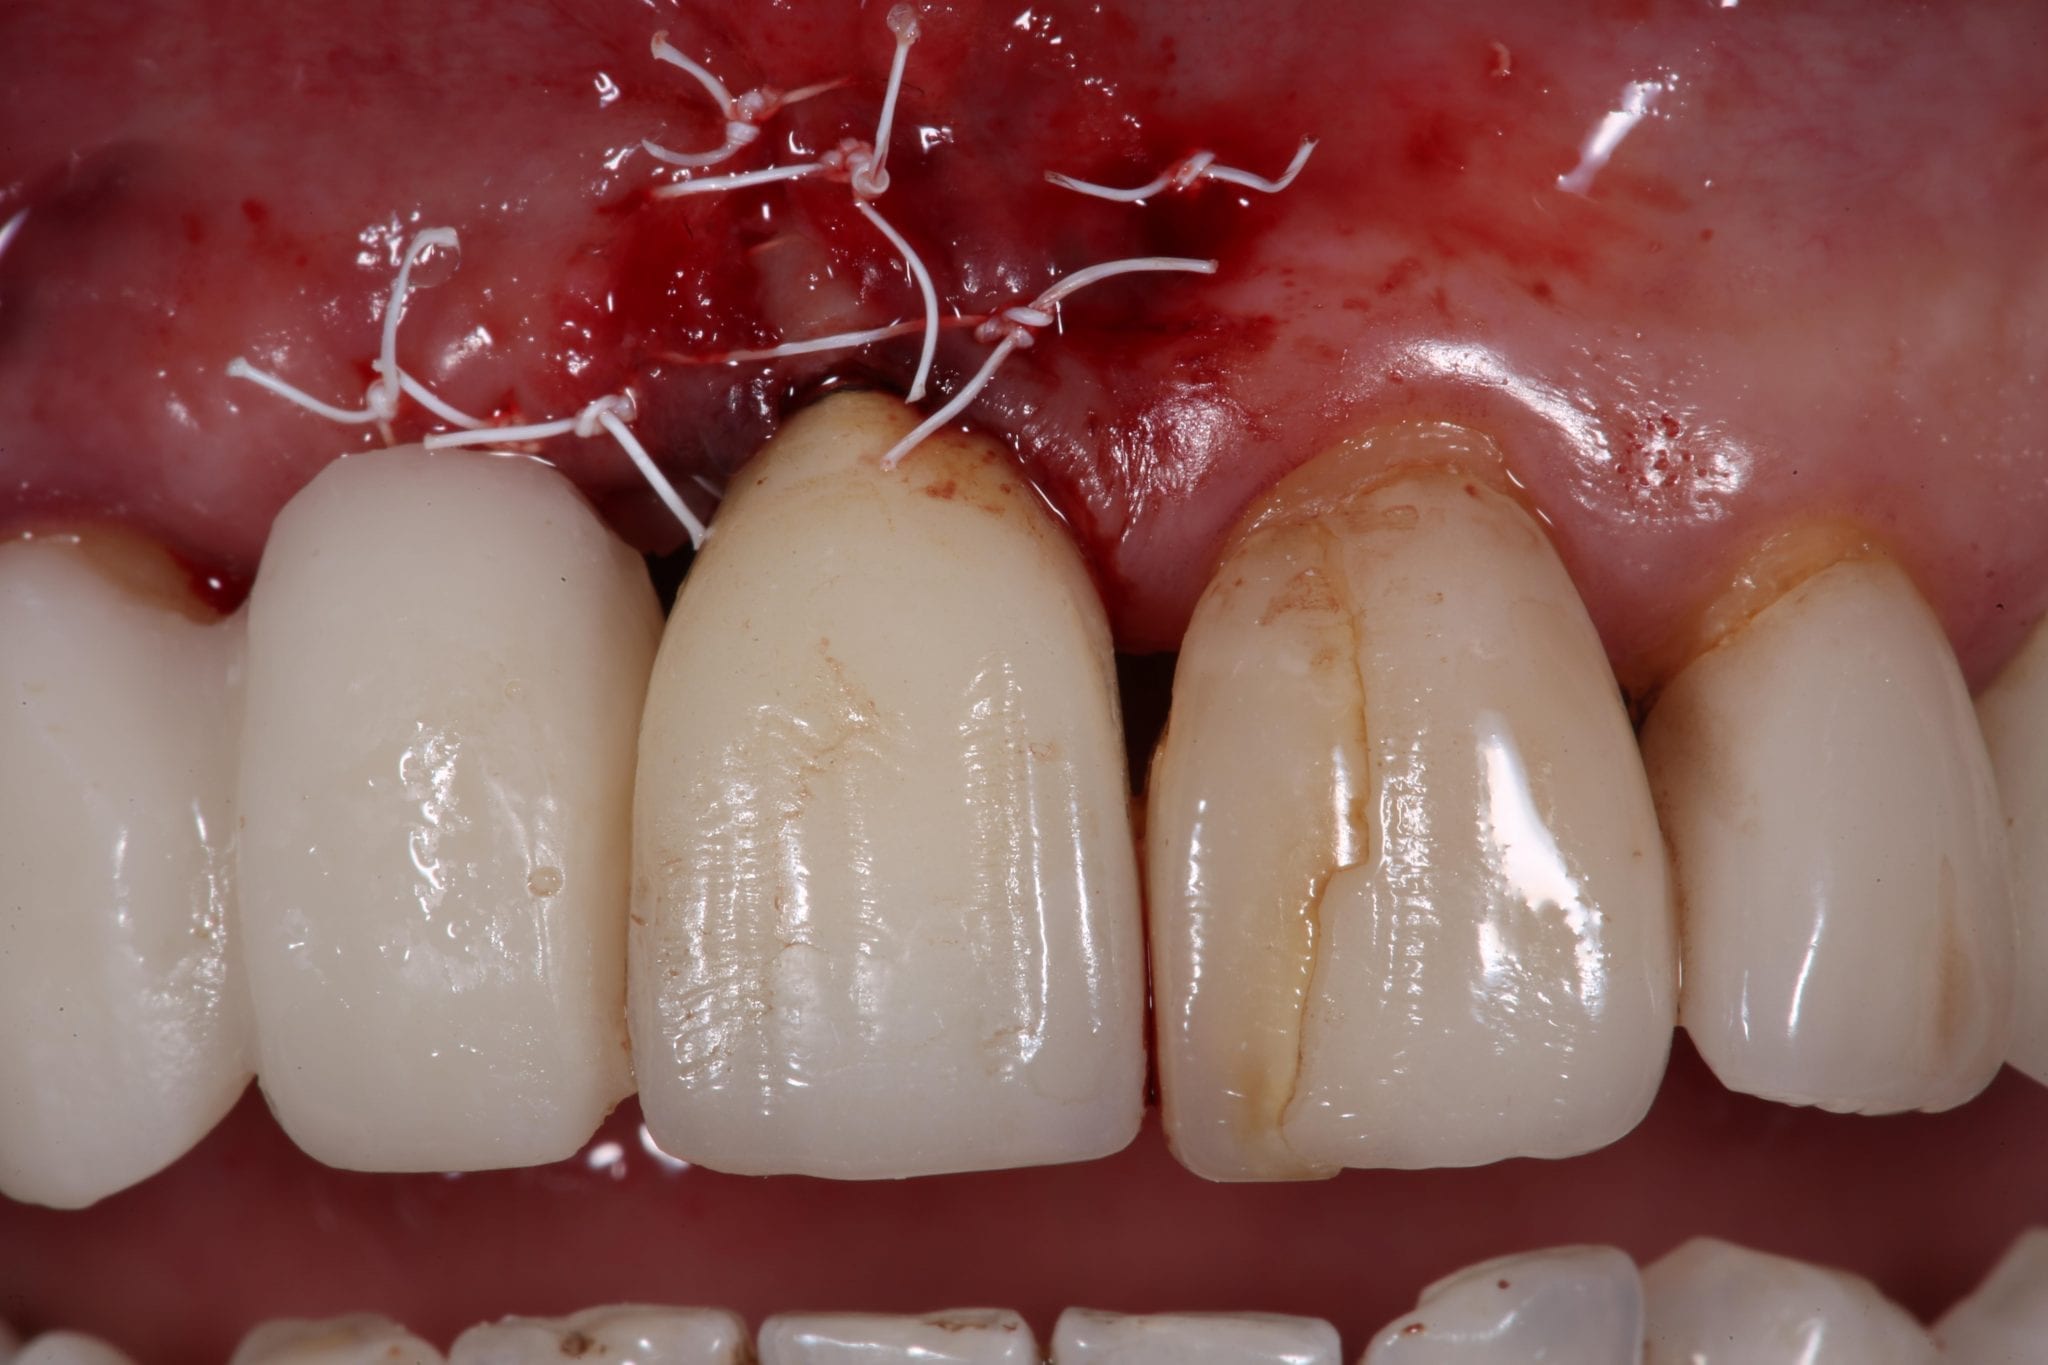
So this is what I did. There are a few sutures holding the graft in position (graft stability is really important too), and a few sutures closing the site as best I could.
This is what it looked like on the day of surgery.

We left it for two weeks, then we had a suture removal appointment.
A note on the sutures. These are PTFE sutures – and this is pretty much all I use nowadays. They are so much cleaner, its difficult to close these with tension, and if there is anything I can do to increase the success of surgery, I will do it. So because they are monofilament, fewer bacteria attachment is definitely a good thing in my book!
I used to use vircyl – rapide, and although they are easy to use, the surgical site always looks more inflamed after two weeks than with these.
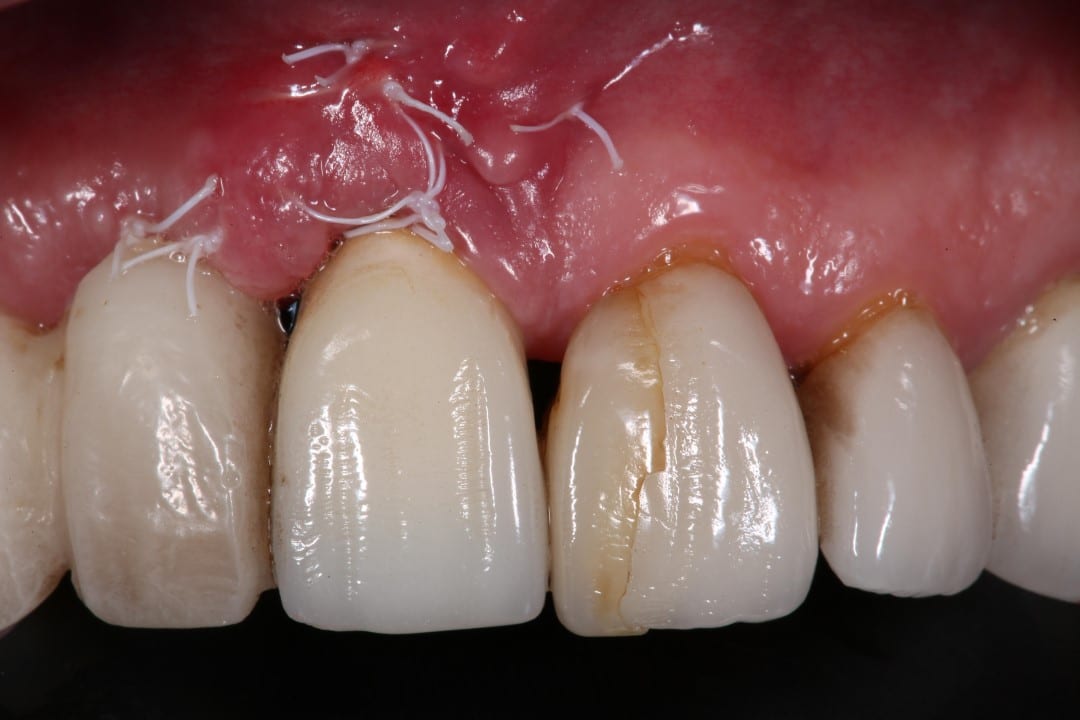
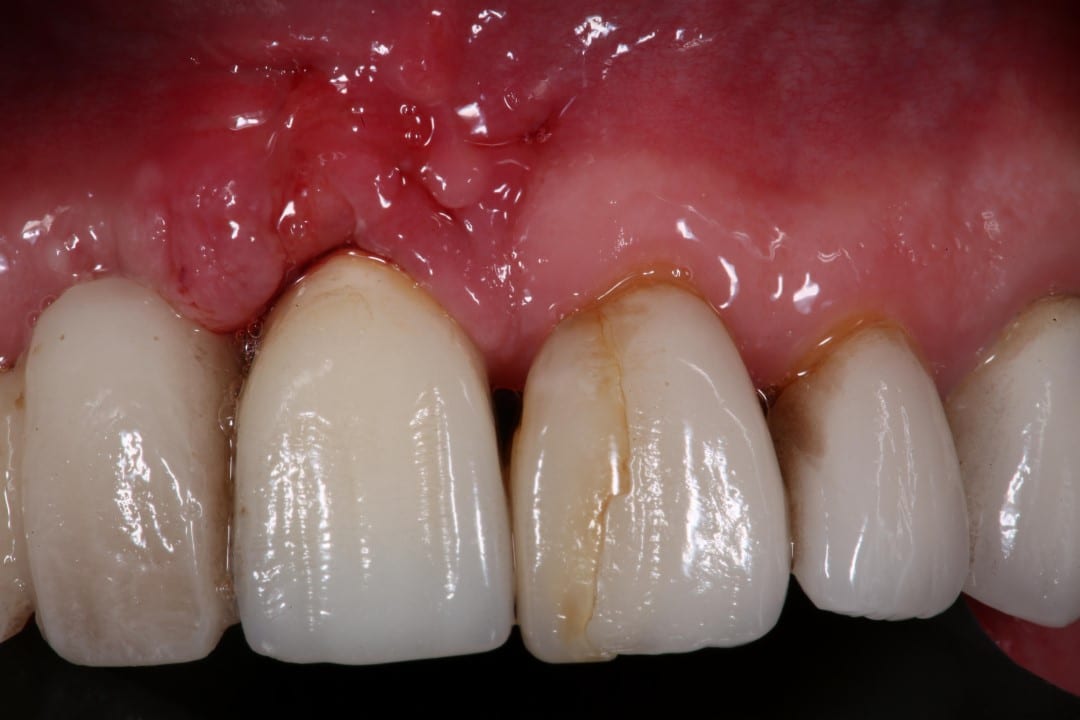
Okay, it’s looking good, but this is going to shrink, and although it looks like nearly full recession coverage, this may not be the case in a few weeks.
I left it a few months from here to make the definitive bridge and crown.
After 3 months…
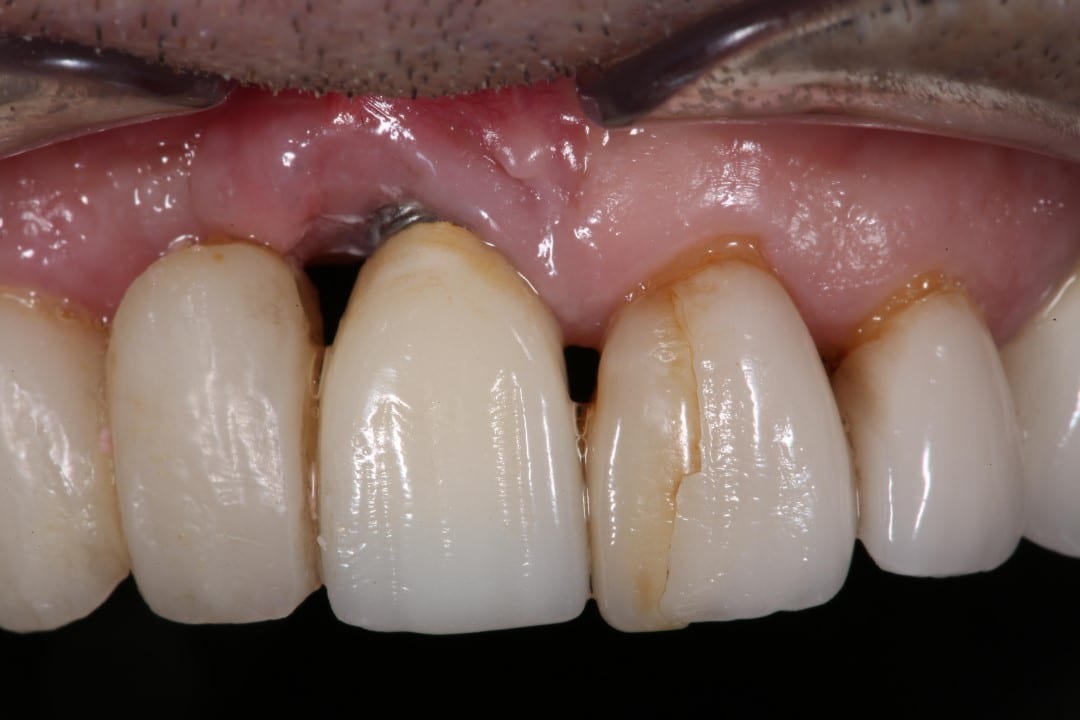
Boo – we got some recession again!
But its really not as bad as it was before. More importantly, look at all that keratinised tissue! That should help protect this implant in the future.
At this stage, we did the final prep on the UL1 and UR3, took impressions, provisionals in luxatemp and used a fragment of the UL1 veneer to send to the lab for a shade match.
Its always worth taking a stump shade as well, to help get the colour exactly right (or as close as possible)
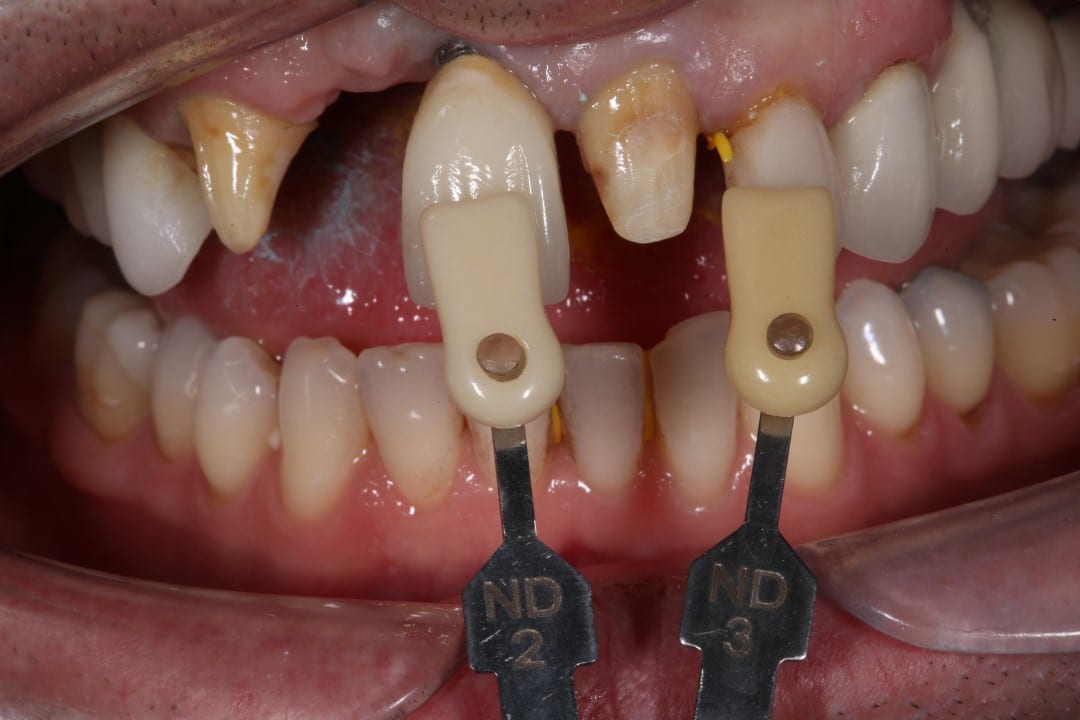
Just a quick note on the UL1. This veneer cracked, and now that you can see the prep underneath, its possible to understand how this could have happened.
My guess is that there was a slight anterior guidance issue, and restriction in the envelope of function here, over time, this would have caused a fracture – so this time, I made sure all the guidance was as shallow as possible, and kept it on natural tooth if possible.
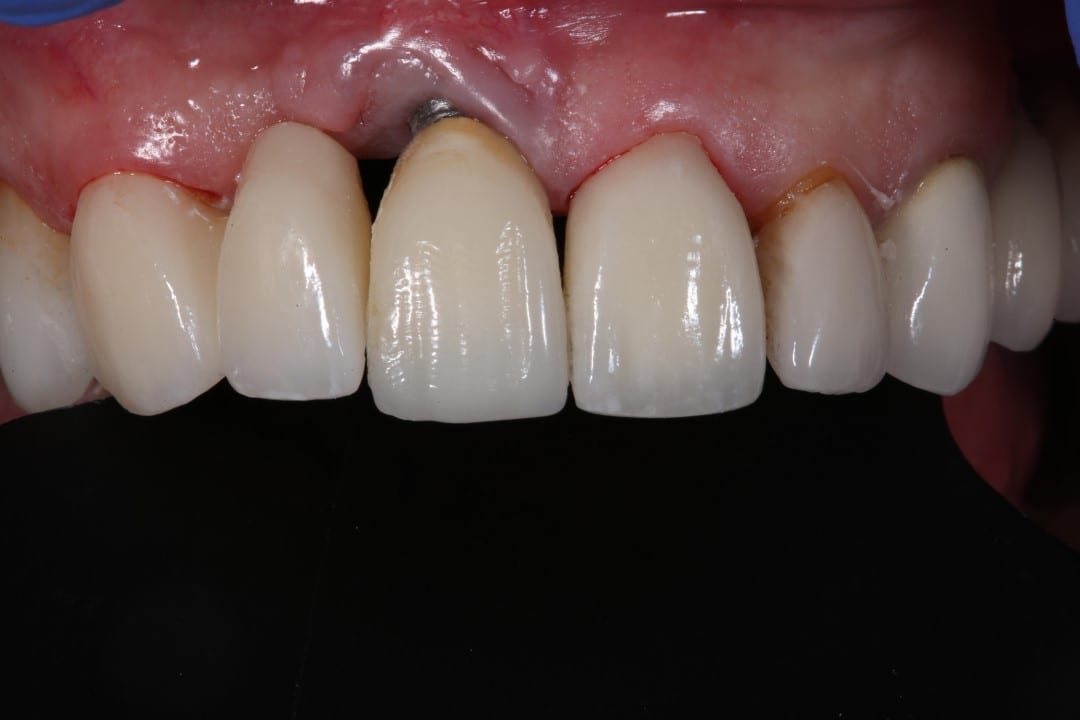
And there we have it! The final restorations were fitted, and I checked the occlusion in two ways. Firstly just biting up and down, making sure I have the same contacts with and without the restorations, then on excursions, ensuring that there is smooth movement on left, right and anterior movements… Then asking the patient to chew the articulating paper to see if there are any harsh contacts during the closing movements of normal chewing movements.
I hope you found this useful, if you have any comments, please pop them below, if you want to read more about some of the interesting stuff I see, then you can always subscribe to this blog by popping your details below, I normally send out 1-2 emails a month.
If you want to contact me, you can do it from my facebook page (I don’t always get notifications when people message me on there), or my Instagram page.
Have a great day!
Gurs
Get Blog / Cases to your Inbox
If you want to be notified by email when I post a new case, just click the button and fill in the form


I am looking my gums upper and lower. Got denture in front lower jaw.
Hi Gurs! I am a recent graduate from the US who was worked at a factory clinic for 2 years and am now in a start-up private practice with a very clinically advanced senior doc. I absolutely love your content because I’ve realized that while I am learning to diagnose much more comprehensively, it is also frustrating because I am aware I have much more learning to do to be able to provide the services my patients need. That’s actually how I found your YT channel – looking for ways to help prosthetic all-on-four failures.
Anyways! I wanted to get your thoughts as to why the recession occurred around this implant – could it have been due to lack of bone or keratinized gingiva at time of implant placement? How to avoid that complication – grafting at time of placement im assuming? What are the determinate factors as to whether a CTG will take or may need re-doing? When you say to ‘keep guidance as shallow as possible’ are you referring to the lingual contours of the maxillary prosthetics? Also – do you have any recommendations for books on functional occlusion? Apologies for the barrage of questions …TYSVM and have a wonderful rest of your day! 🙂
Jennifer W.
Hi Jennifer!
Thanks for your comment, and its great you are in the right type of practice to really grow.
It sounds like you are improving your knowledge, the other thing is practice, and you really can’t rush that bit!
I think the problem in this case was that the implant was placed with very little buccal bone, no grafting, as it was placed the ‘Tatum’ way, with ridge splittling. Over time, because the buccal bone and lack of keratinised tissue just left him with an exposed dental implant.
The best thing would have been to graft at time of placement (in my opinion).
In all honesty, I was not sure how well the CTG would take, and I let my patient make that decision, as to if we should try. I do know that if I tried to remove the implant (it doesn’t have a thread pattern, so cant be rotated out), I would be left with a massive defect in the bone, making it a lot harder to improve.
I have heard a lot of implant surgeons relying a lot on keratinized tissue, so we thought it would be a minimally invasive way to try and correct the problem, and the patient’s expectations were realistic.
In terms of Guidance, I do mean the lingual contours of the maxillary prosthetics. I learned 99.99% of my occlusion stuff from the more experienced dentists that I worked with, and practice. Essentially, if you can build up in CR and minimal interferences on guidance and function, then you should not have any problems with occlusion.
This is a bit over simplified, but it works.
I am actually putting together a course on occlusion, and how I treat the vast majority of my cases. If you would like to know about that, I can drop you an email, or you can follow me on Instagram, where I will probably announce it!
I hope this helps – and have a fantastic day 🙂
Gurs