

Its surprising how many people call up the clinics where I work, and their main complaint is the gap or gaps between the teeth. Most commonly a nice, juicy midline diastema.
Most people will know that this can be reduced or eliminated with composite, porcelain or orthodontics. Without doubt, composite is the cheapest and quickest way to do this, however – it can easily look crap!
Here are my tips of what to look for when you are doing this.
Understand the problem.
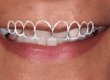
Most people want a great looking smile, and if you have been doing cosmetic dentistry for a while, you will have a ‘perfect smile’ image tattooed on your brain, and this will tell you that the central incisors need to have a width of about 75% of the height, and the height should be about 11mm, and the visible width of every tooth as you move away from the midline should reduce by the golden proportion.

As you start to deviate from this, things start looking odd.
Also, the tooth shape should look natural – its so easy to create triangular looking teeth that flare out from the gum line with some un-natural looking emergence profile!
-

- Poor Emergence

-
- Better Emergence

As soon as you add composite to the tooth, you are changing the height – width ratio, and the golden proportion, and the problem with that is – tooth width is never the main problem. In most cases, nature gets the tooth shape/proportion correct, the problem is the tooth position.
To make things more complex, closing diastema’s with ortho is tricky because the position of the teeth is often governed by the soft tissues, and to close a gap can take a disproportionately long time!
Right, lets get back to the point.
In this case, I closed this lady’s lower spaces with ortho – that was easy. Now she wanted a reduction in the upper diastema.

Luckily, she just wants a reduction, and not a complete closure!
The most important thing for me is to get the emergence profile right. When you do not pay attention to this, the teeth start to look triangular.
Step 1 : Choose the colour. This is probably less important than you think, I chose a block B1 Venus Diamond, and nothing else.
Step 2: Sandblast, etch and bond the tooth. The important things here is to prepare the tooth right to the CEJ, there is about 2-3mm of free gingivae on the mesial aspects of these teeth, you need to prep all the way down there, because you will need to bond down there too.
Step 3: Create the emergence angle.
To do this, I use a flat plastic, and flowable composite:

The left tooth has been prepared, and you can see the flat plastic pushing the gum and I put flow into the space, then cure.
Don’t worry that its not smooth or tidy at this stage, we will correct that later!
Step 4: Build the teeth up, making sure that you build each tooth up symmetrically, and keep the midline parallel to the long axis of the patients face.
Step 5: Polish the crap out of it!
When you are polishing, you have to be careful to keep the line angles of the teeth in the place you want to keep them. You can do this with sof-lex discs (which is what I used here).
Get rid of the step between the composite and the tooth with the most rough disc, and use the other discs at high speed to get the nice smooth polish.
Step 6: Look at the distal line angles. Because you’re making the tooth wider, it is sometimes helpful to bring the distal line angles closer to the middle of the tooth. This gives the illusion of narrowing the tooth. Cosmetically it is very important to keep the line angles symmetrical. Also, it is nice to soften the distal corner of the central incisors if they are sharp and you can also level out the incisal edge at this stage too.
Step 7: Smoothing out under the gum.
For this I used a red flame shaped high speed bur

The way I use this is to literally go blind under the gum, and make sure its all smooth by using a sharp probe.

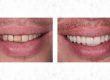
The end result is very natural, even at close inspection. The mesial line angles could be improved, but are always learning – right?!
The teeth don’t look too wide because the distal line angles were brought into the body of the tooth, as opposed to keeping them distal. Also, the distal edge of the centrals were flared out, and this was adjusted to make them more straight.
The colour and the composite probably doesn’t matter that much. In this case, it was Venus (probably venus diamond – or whatever we had!), and I think shade is B1. Simple right, no layering, no complex shading – this case does not need that!
At the end of the day, this lady wanted a quick solution to her problem, and she left the surgery over the moon with the result. There was no need to increase the time and expense to the patient by doing wax-ups, complex shading.


Let me know what you think, if you found this useful, or what you might have done differently.
You can contact me on Twitter (@gurssehmi), Facebook (search Gurs’s Dental Tips), or Instagram (Gurs_Sehmi)




Hi there,
Did you prep the tooth as if any other veneer or did you do anything different? Also how much tooth tissue did you take off?
Thanks,
Great result by the way,
Hi Rima,
Thanks for your comment!
The only prep I did to the tooth was the distal aspect, where there is no composite. This was all done with sof-lex discs – really minimal.
I think the key is really polishing it so much that the junction is completely invisible.
Gurs