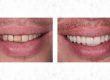
Now, every brace company out there is promoting how fast their system is. The truth is that if you put a force on a tooth, it will move at its own pace, no matter the what shape bracket, or how its ligated.
I will stress though, that the quality of the bracket, and the appropriate type of wire is very important in achieving a great end result… But I’ll leave this topic for another post.
Let’s talk about this cool little case, and I’ll show you exactly what I did to keep the appointments to an absolute minimum, chair time to a minimum, and still deliver excellent results.
The Case


So the main problems here are:
- Crowding (upper and lower arch, both mild)
- Tooth wear issues
- Asymmetrical gingivae
- Uneven colour
- Rough edges to the teeth
We can tackle most of these things with simple ortho and bonding!
The Pre Ops (Click to enlarge)


When I do any ortho case, I will still do an ortho assessment, but just so I don’t boar you to death, here is my summary:
Mild upper and lower crowding, on an SK1 base, with right canine 1/2 unit class 2, and left canine class 1. There is a slightly increased overbite, and the lower midline is 3mm to the right.
Bond Up

With all ortho, bracket placement is key – this is how I visualise it.
First, imagine the teeth without any tooth wear. The correct height/ width ratio etc.
Now look at the long axis, and the midpoint of the tooth, if it was not worn. (so mid point with the imagined blue line)
Then just visualise the gingival margins (yellow). In situations where the gingival margin will be visible, I always aim to align the upper gingival margins, then correct the incisal edge with composite or porcelain.

The eagle eyed will notice I got 3M Gemini brackets – these are by far my favorite bracket because of their quality, and ease of debond.
Because this case is really simple, I jumped straight into an 18 niti wire, and left it for 6 weeks.
After 6 weeks

Check it out! Almost done right!
Gingival margins are looking great, and arches are levelling nicely.
Yeah, we got a nice little gap – nothing that a little powerchain can’t solve, so all I did here was: Change to a 20×20 niti wire, and upper powerchain 3-3, and left it for another 6 weeks.


Okay, braces off!
Yes, it still looks crap, but its all good, because the patient knew at the outset that this would happen. This is what I did at this appointment:
- Fit fixed retainer
- Debond ortho
- Composite build ups where needed
- Impressions for vacuum formed retainers
I normally stick the fixed retainer on before the debond. This can create a little difficulty when doing the composite, but nothing you can’t handle, as long as you are careful.


Upper retainer is normally 2-2, lower is 3-3.
As you can see, I just separate the teeth, overbuild in composite, then polish down. Any defects (like on the UR1m) are filled in with flow – but this is why you need good magnification.
The composite looks translucent, and you can see exactly where the composite is… Well, the dentist can, not the patient – she loved it at this stage!
After 1 week


Luckily after a little rehydration, the bond up’s look a lot better!
Anyway, at this review appointment, we fitted the VFR, and gave follow up instructions, went through whitening and all that!
I am pretty happy with this case, the UR2 could be improved with a little buccal root torque, and the gingivae on the UR2 could be improved with a laser… But I think I’m getting a little too picky – the patient loved the result!
All questions/ comments welcome 🙂
If you got something out of this, and found it useful, please like my facebook page, which is where I post my best content